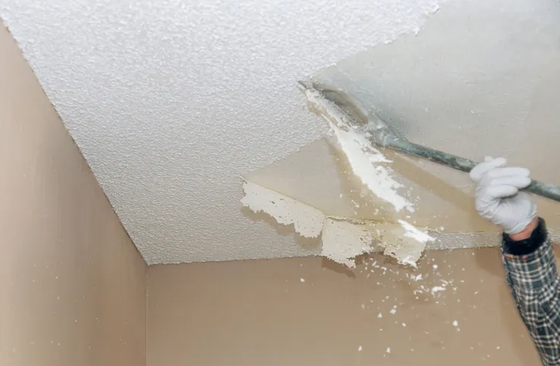
 Removing a popcorn ceiling is not a task for the faint of heart. But with a bit of determination and the right tools, it can be done.
First, gather your materials. You'll need a ladder, a scraping tool, a sponge, a bucket, and a joint compound. Next, prepare the room. Move all furniture out of the way and cover the floor with drop cloths. Climb the ladder and begin scraping away at the popcorn texture with your tool. It will take some muscle and patience, but keep at it. Dampen the sponge in the bucket of water and wring it out, then use it to soften any stubborn pieces of texture. Be careful not to gouge the drywall underneath. And if you do, have some joint compound ready to patch it up. Once all the popcorn is removed, take a step back and survey your work. You may need to do some touch-up with the joint compound to make the ceiling smooth. Finally, let the ceiling dry completely before painting or applying new texture. And remember, a job worth doing is a job worth doing right. So take your time, and don't be afraid to call in a professional if you need help. In short, removing a popcorn ceiling is a task that requires patience and effort. Gather the right tools, prepare the room, scrape away the popcorn texture, be careful not to damage the drywall, touch up with joint compound, let it dry and voila! A smooth ceiling ready for a new look. If this task is not your cup of tea, call the painting experts at Freedom Painting Company to make your life easier.
0 Comments
 Are you tired of looking at the same boring walls in your home or office? Adding an accent wall can be a simple and effective way to add some personality and interest to a room. But where do you start?
First, consider the size and layout of the room. An accent wall is usually best in a smaller space, as it can help to balance out the proportions and create a cohesive look. In a larger room, you might want to consider using multiple accent walls or using a bold color or pattern on just one wall. Next, think about the overall design style of the room. Do you want to create a dramatic, bold look or a more subtle, understated effect? This will help you choose the right color, pattern, or finish for your accent wall. There are many options for creating an accent wall. Here are a few ideas to get you started:
For expert help in the Lubbock, TX area, please contact: Freedom Painting Company  Deciding whether to hire a professional painter or tackle a painting project on your own can be a difficult decision. There are pros and cons to both options, and ultimately, the right choice will depend on your specific circumstances and needs.
If you're considering a DIY painting project, it's important to consider the time, effort, and skills that will be required. Painting can be a labor-intensive task, especially if you're working on a large or complex project. It can also be time-consuming, especially if you're not experienced with painting and need to take breaks to research techniques or troubleshoot issues as they arise. Additionally, proper preparation and execution are key to achieving a professional-looking paint job. This includes properly preparing surfaces, using the right tools and techniques, and knowing how to properly mix and apply paint. If you're not familiar with these steps, you may end up with a subpar paint job that will require additional time and resources to fix. On the other hand, hiring a professional painter can save you time, effort, and potentially even money in the long run. Professional painters are skilled at their craft and have the experience and knowledge to get the job done efficiently and effectively. They also have access to high-quality paints and tools, which can help ensure a longer-lasting and better-looking paint job. Another benefit of hiring a professional painter is that you'll have a team of professionals working on your project. This can be especially helpful if you're tackling a large or complex project, or if you have multiple areas of your home that need to be painted. Of course, hiring a professional painter does come with its own set of considerations. The most obvious is cost. Professional painting services can be expensive, especially if you're hiring a team to tackle a large project. However, it's important to keep in mind that the cost of a professional paint job may be offset by the time and effort you save by not having to do it yourself, as well as the potential for a longer-lasting and better-looking paint job. Ultimately, the decision to hire a professional painter or tackle a painting project on your own will depend on your specific circumstances and needs. If you have the time, effort, and skills to take on the project yourself, a DIY approach may be the right choice. However, if you're short on time or lack the necessary skills, hiring a professional painter may be the best option for achieving the results you want.  Selecting the right paints and brushes for your painting project is an important step that can greatly impact the final result of your work. There are several factors to consider when making these choices, including the surface you will be painting on, the type of paint you will be using, the finish you want to achieve, the level of detail you want to include, and the quality of the materials. In this article, we will delve deeper into each of these factors to help you choose the best paints and brushes for your project.
For expert help in the Lubbock, TX area. Please call Freedom Painting Company.  Painting the interior of a house can be a daunting task, but with the right tools and a little bit of know-how, it's a project that anyone can tackle. Whether you're looking to freshen up a single room or give your entire home a new look, this guide will provide you with everything you need to know to get started.
Before You Start: Preparing the Room and Gathering Supplies Before you begin painting, it's important to properly prepare the room and gather all the necessary supplies. Here's what you'll need:
Once you've gathered all your supplies, it's time to prepare the room. Remove all furniture and decorations from the room, and cover the floor with drop cloths or plastic sheeting. Next, repair any holes or imperfections in the walls using spackling paste or drywall compound. Once the repairs are dry, sand the walls down to create a smooth surface. Step 1: Protect the Trim and Outlets Use masking tape and newspaper to protect the trim and outlets from overspray. Be sure to press down the edges of the tape firmly to create a tight seal. Step 2: Prime the Walls Use a roller to apply a coat of primer to the walls. This will help the paint adhere better and provide a more even finish. Be sure to follow the instructions on the primer can, and allow it to dry completely before moving on to the next step. Step 3: Paint the Walls Now it's time to apply the main color to the walls. Use a roller to apply the paint in a W-pattern, starting at the top of the wall and working your way down. Make sure to overlap your strokes to ensure an even finish. If you need to cut in around corners or tight spaces, use a brush. Step 4: Finish the Trim Once the walls are painted, it's time to finish the trim around the windows, doors, and baseboards. Use a brush to apply the paint in a smooth, even coat. Step 5: Clean Up Once the paint is dry, remove the masking tape and newspaper, and dispose of the drop cloths or plastic sheeting. Put the furniture and decorations back in the room, and admire your newly painted space! Tips and Tricks for a Professional Finish
Painting the interior of a house can be a rewarding and satisfying project, but it's important to plan ahead and take the necessary precautions to ensure a successful outcome. With the right tools and a little bit of know-how, you can transform any room in your home into a fresh, vibrant space that you'll be proud to show off.  Painting the exterior of a house can be a daunting task, but with the right tools, techniques, and preparation, anyone can do it. Here are the steps you should follow to paint the exterior of a house:
Repair any damages or imperfections: Before you start painting, it's important to repair any damages or imperfections on the surface of the house. This includes filling in any holes or cracks, sanding down rough spots, and smoothing out any bumps or uneven areas. Clean the surface: It's important to clean the surface of the house before you start painting. This will help the paint adhere better and give you a smooth, even finish. Use a pressure washer or a hose and scrub brush to remove dirt, grime, and debris from the surface of the house. Be sure to let the surface dry completely before you start painting. Protect areas that shouldn't be painted: Before you start painting, it's important to protect any areas of the house that shouldn't be painted. This includes windows, doors, trim, and any other areas that you don't want to get paint on. Use painter's tape and drop cloths to cover these areas and protect them from accidental splatters or drips. Choose the right paint: Choosing the right paint is important for a successful paint job. Consider the type of surface you'll be painting, the climate in your area, and the desired finish. For example, if you're painting wood siding, you'll want to use a paint that's specifically designed for wood. And if you're painting a house in a humid climate, you'll want to use a paint with a high level of moisture resistance. Gather your tools and materials: Once you've chosen the right paint, it's time to gather your tools and materials. You'll need a paintbrush, roller, and paint tray for applying the paint. You'll also need a ladder if you're painting high areas of the house, and a power washer or hose if you need to clean the surface of the house. Prepare the paint: Before you start painting, you'll need to mix and prepare the paint according to the manufacturer's instructions. This may involve stirring the paint, thinning it with water or thinner, or adding a primer. Be sure to follow the instructions on the paint can to get the best results. Start painting: Once you've prepared the paint, it's time to start painting. Start by painting the trim and corners of the house, using a paintbrush or roller to apply the paint. Then, move on to the larger areas of the house, using a roller to apply the paint in even, vertical strokes. Be sure to overlap your strokes to avoid leaving paint lines or streaks. Let the paint dry: Once you've finished painting, it's important to let the paint dry completely before you remove any painter's tape or drop cloths. This will prevent any accidental smudging or smearing of the paint. Follow the manufacturer's drying time recommendations, which will vary based on the type of paint you're using. Clean up: After the paint has dried, it's time to clean up your tools and materials. Wash your brushes and rollers with warm, soapy water to remove any excess paint. Then, store your tools and materials in a dry, safe place until you're ready to use them again. By following these steps, you can successfully paint the exterior of your house and give it a fresh, new look. Remember to take your time and pay attention to detail, and you'll be able to achieve professional-quality results. |
AuthorThe author is a local services expert with blogs on various niches. He is currently in quarantine lockdown in Asia. Happy 2021! ArchivesCategories |
 RSS Feed